Printing image with PowerShell
Contents
Backstory
We have an inkjet printer that is rarely used. This results in problems with printing: print head nozzles get clogged, and when somebody once in a while tries to use the printer, some colors are missing from the printout. This is usually solved by a series of “clean print head” procedures followed by printing nozzle check pattern until the problem is gone, or sometimes by visiting a repair center.
A technician from the repair center said it is good to print on the inkjet regularly in order to prevent such problems. So it was decided to make our printer to print a page with a test image at some days of a week. We created a scheduled task on our print server that runs a PowerShell script, the script prints an image on the printer. The task is executed couple of times per week, which helps to prevent ink from drying in the print head nozzles. Yes, we know that this is a lame and “eco-friendly” solution, but we can stick with it for some time until we get a printer that can survive longer idle periods.
Printing overview
Out task is to print an image stored on a disk. Let’s say we want to position the image at the center of the page and make it fit the whole printable area of the page. The printout should look like this (there are two variants for images with different aspect ratio):
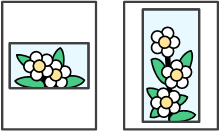
So, we need to do the following:
- Read an image (PNG or JPG) from a file on a disk.
- Scale the image to fit the page printable area and position it in the center of the printable area.
- Print the image.
Let’s take a closer look at these steps starting with printing itself, because everything else takes place in the context of printing.
Printing in .NET via PowerShell
Let’s highlight some key aspects of printing in .NET without digging into deep, just to get the general idea of what we are going to deal with. If you want to know more, you can find more comprehensive publications on this topic:
- Printing in C# made easy — thorough overview of printing functionality available in .NET Framework;
- System.Drawing.Printing namespace — Microsoft documentation on printing functionality in .NET Framework;
- Printing documents using PowerShell — article describing how to print a geometric object (a rectangle), an image and text in PowerShell.
This article just compiles the essentials from the sources listed above.
In .NET printing-related services are provided in the System.Drawing.Printing namespace. The illustration below shows classes that we are going to use when printing the image and outlines main steps of the printing process.
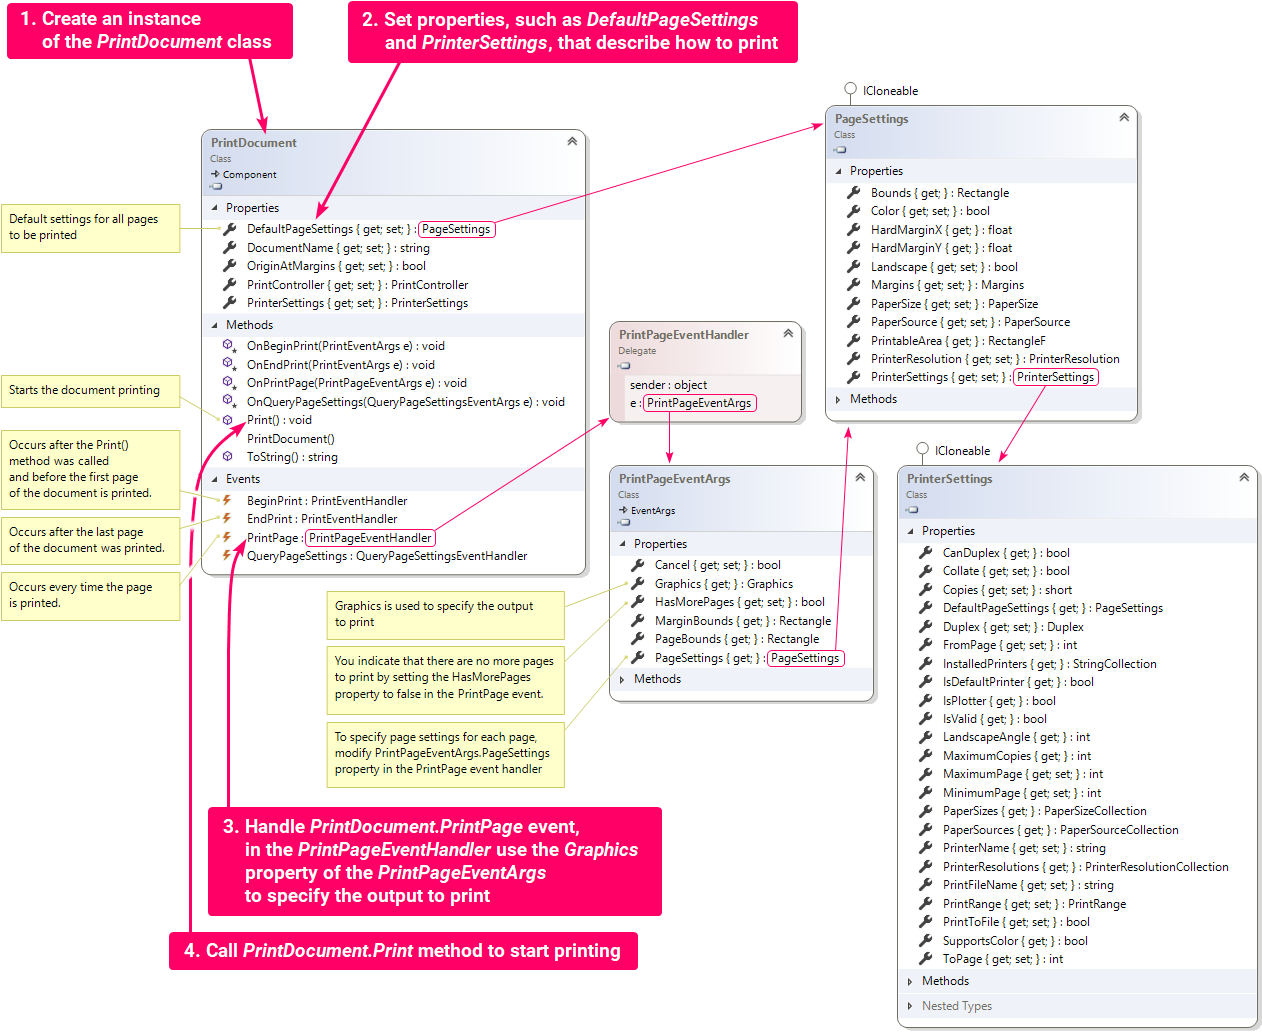
This is how Microsoft documentation describes what you have to do in order to send output to a printer:
Create a new instance of the PrintDocument class, set properties, such as DefaultPageSettings and PrinterSettings, that describe how to print, and call the PrintDocument.Print method to actually print the document. Calling the PrintDocument.Print method raises the PrintDocument.PrintPage event, which should be handled to perform the document layout for printing.
Use the Graphics property of the PrintPageEventArgs object obtained from the PrintDocument.PrintPage event to specify the output to print.
According to the description, this is what we have to do in order to print a page with PowerShell:
-
Make printing-related classes available in the PowerShell session:
Add-Type -AssemblyName System.Drawing
-
Create an instance of the PrintDocument class.
$PrintDocument = New-Object System.Drawing.Printing.PrintDocument
-
Specify a printer to use:
$PrintDocument.PrinterSettings.PrinterName = "Epson WF-3720"You can list printers installed on your system using PrinterSettings.InstalledPrinters property or Get-Printer cmdlet:PS C:\> [System.Drawing.Printing.PrinterSettings]::InstalledPrinters Microsoft XPS Document Writer Microsoft Print to PDF Kyocera P3055dn Kyocera P3045dn Epson WF-3720 Canon iR1435iPS C:\> (Get-Printer).Name Microsoft XPS Document Writer Microsoft Print to PDF Kyocera P3055dn Kyocera P3045dn Epson WF-3720 Canon iR1435i
-
Specify paper size for all pages: set the PageSettings.PaperSize property of the $PrintDocument to a PaperSize supported by the printer.
$PrintDocument.DefaultPageSettings.PaperSize = ` $PrintDocument.PrinterSettings.PaperSizes | where Kind -eq "A4"PrinterSettings.PaperSizes property contains collection of paper sizes that are supported by the currently selected printer.PS C:\> $PrintDocument.PrinterSettings.PrinterName = "Epson WF-3720" PS C:\> PS C:\> $PrintDocument.PrinterSettings.PaperSizes ` | sort RawKind ` | FT RawKind, Kind, PaperName, Width, Height RawKind Kind PaperName Width Height ------- ---- --------- ----- ------ 1 Letter Letter 8 1/2 x 11 in 850 1100 5 Legal Legal 8 1/2 x 14 in 850 1400 8 A3 A3 297 x 420 mm 1169 1654 9 A4 A4 210 x 297 mm 827 1169 11 A5 A5 148 x 210 mm 583 827 12 B4 B4 257 x 364 mm 1012 1433 13 B5 B5 182 x 257 mm 717 1012 20 Number10Envelope Envelope #10 4 1/8 x 9 1/2 in 413 950 27 DLEnvelope Envelope DL 110 x 220 mm 433 866 31 C6Envelope Envelope C6 114 x 162 mm 449 638 66 A2 A2 420 x 594 mm 1654 2339 70 A6 A6 105 x 148 mm 413 583 256 Custom User-Defined 827 1169 258 Custom A3+ 329 x 483 mm 1295 1902 259 Custom B3 364 x 515 mm 1433 2028 263 Custom 100 x 148 mm 394 583 267 Custom 13 x 20 cm (5 x 8 in) 500 800 268 Custom 20 x 25 cm (8 x 10 in) 800 1000 281 Custom 9 x 13 cm (3.5 x 5 in) 350 500 284 Custom 13 x 18 cm (5 x 7 in) 500 701 285 Custom 10 x 15 cm (4 x 6 in) 400 600 306 Custom 16:9 wide size (102 x 181 mm) 400 711Note that different printers may have different paper names:PS C:\> $PrintDocument.PrinterSettings.PrinterName = "Canon iR1435i" PS C:\> PS C:\> $PrintDocument.PrinterSettings.PaperSizes ` | sort RawKind ` | FT RawKind, Kind, PaperName, Width, Height RawKind Kind PaperName Width Height ------- ---- --------- ----- ------ 1 Letter Letter 850 1100 5 Legal Legal 850 1400 6 Statement Statement 550 850 7 Executive Executive 725 1050 9 A4 A4 827 1169 11 A5 A5 585 827 13 B5 B5 717 1012 20 Number10Envelope Envelope No. 10 (COM10) 412 950 27 DLEnvelope Envelope DL 433 866 28 C5Envelope Envelope C5 638 902 37 MonarchEnvelope Envelope Monarch 387 750 256 Custom Custom [Name Fixed] 827 1169Here paper width and height are provided in hundredths of an inch. For example, for A4 (210 mm × 297 mm) paper format:827 * 25.4 / 100 = 210.058 1169 * 25.4 / 100 = 296.926
-
Specify page orientation. Default value of the Landscape property is determined by the printer.
$PrintDocument.DefaultPageSettings.Landscape = $false
-
Specify the DocumentName of the $PrintDocument. This name will be displayed, for example, in the printing queue.
$PrintDocument.DocumentName = "Test Page for Printers.png"
- Specify other printing settings, if necessary. To get familiar with them see the documentation for PageSettings and PrinterSettings classes.
-
Provide event handlers for the BeginPrint, PrintPage, EndPrint events of the $PrintDocument. This is what Microsoft says about them:
The code snippet for adding event handlers:
PrintDocument.BeginPrint event — occurs when the PrintDocument.Print method is called and before the first page of the document prints. Typically, you handle the BeginPrint event to initialize fonts, file streams, and other resources used during the printing process.
PrintDocument.PrintPage event — occurs when the output to print for the current page is needed. To specify the output to print, use the Graphics property of the PrintPageEventArgs. For example, to specify a line of text that should be printed, draw the text using the Graphics.DrawString method.
PrintDocument.EndPrint event — occurs when the last page of the document has been printed. Typically, you handle the EndPrint event to release fonts, file streams, and other resources used during the printing process, like fonts.
$PrintDocument.add_BeginPrint({ param($Sender, $PrintEventArgs) # Prepare resources required for printing }) $PrintDocument.add_PrintPage({ param($Sender, $PrintPageEventArgs) # Draw the output that you want to appear on the printout # using $PrintPageEventArgs.Graphics methods }) $PrintDocument.add_EndPrint({ param($Sender, $PrintEventArgs) # Cleanup resources })To “draw” an image on the PrintPageEventArgs.Graphics, we can use Graphics.DrawImage(Image, RectangleF) method. Later in this article we will see how we can create Image and RectangleF for this method. -
Start printing by calling PrintDocument.Print method.
$PrintDocument.Print()
Now we know enough to be able to print a single page. You can try to do more elaborate things, for example, printing multiple pages and double-sided printing, but this is out of the scope of this article.
Reading an image file from a disk
The first parameter of the Graphics.DrawImage(Image, RectangleF) method specifies the image to print. We need to provide a System.Drawing.Bitmap as a value of this parameter. The most obvious way of creating a Bitmap from an image file on a disk is using a Bitmap(String) constructor that takes path to the image as an argument.
So, the printing code should look something like this:
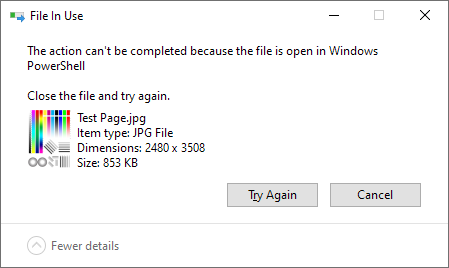
Note, that after using a Bitmap(String) constructor:
While the file is locked it is not possible to write to that file or delete it:
Another way of creating a Bitmap is reading file with System.IO.File.ReadAllBytes method and converting it to a Bitmap using System.Drawing.ImageConverter.ConvertFrom method:
ReadAllBytes method:
If you don’t want your image file to be locked while printing, you can stick with this variant.
Scaling and positioning the image on the page
The second parameter of the Graphics.DrawImage(Image, RectangleF) method specifies size of the image and its location on the page. We need to find dimensions and coordinates of that RectangleF. To start, let’s see how we can get dimensions of the page itself. In the PrintPageEventHandler(Object, PrintPageEventArgs) dimensional page properties can be accessed through the PrintPageEventArgs:
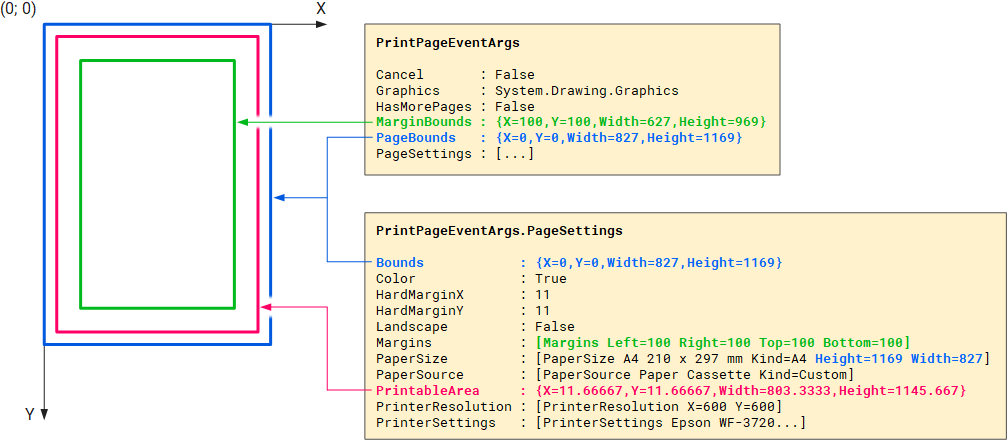
Here is what Microsoft documentation says about these properties:
PrintPageEventArgs.MarginBounds — gets the rectangular area that represents the portion of the page inside the margins.
PrintPageEventArgs.PageBounds — gets the rectangular area that represents the total area of the page.
PageSettings.Bounds — gets the size of the page, taking into account the page orientation specified by the Landscape property.
PageSettings.HardMarginX — gets the x-coordinate, in hundredths of an inch, of the hard margin at the left of the page.
PageSettings.HardMarginY — gets the y-coordinate, in hundredths of an inch, of the hard margin at the top of the page.
PageSettings.Margins — a Margins that represents the margins, in hundredths of an inch, for the page. The default is 1-inch margins on all sides.
PageSettings.PrintableArea — a RectangleF representing the length and width, in hundredths of an inch, of the area the printer is capable of printing in.
Let our page have portrait orientation and let the image take all available space on the page (that is, all available space on the page PrintableArea). There are two possible ways of positioning our image on the page:
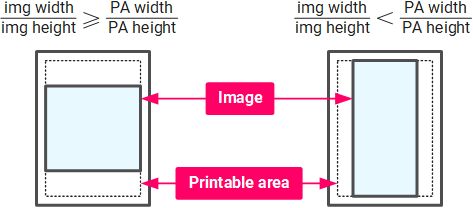
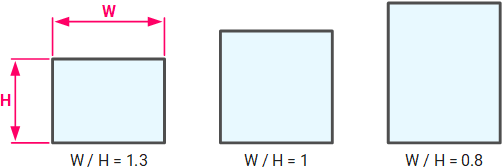
To select between the two we need to compare width to height ratio of the image to width to height ratio of the page printable area. If you have a question about where this comparison comes from, see the illustration below, that demonstrates how width to height ratio of a rectangle depends on its dimensions.
Now, knowing how we want to position our image on the page and having image and page dimensions, in the PrintPageEventHandler let’s calculate width, height and coordinates of the RectangleF that we will pass to the Graphics.DrawImage method. Once the bitmap and RectangleF have been created, we are all set to “draw” the image:
Homework: make this script change page orientation to match the aspect ratio of thi image.
PowerShell script that prints an image on a printer
Now, let’s put all the snippets above into a single script. Just to note, the PrintDocument.BeginPrint and PrintDocument.EndPrint event handlers are not provided in the script below, because we are printing a single page and it is possible to put everything into the PrintPageEventHandler.
Let’s save this script on our print server: C:\Scripts\Print Image.ps1.
Creating a scheduled task running the script
Now we can create a scheduled task running our script either in Task Scheduler or with schtasks.exe:
After running this command schtasks.exe outputs warning:
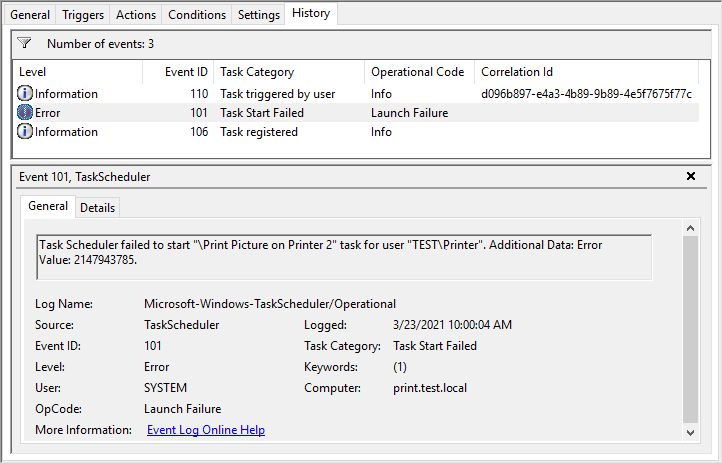
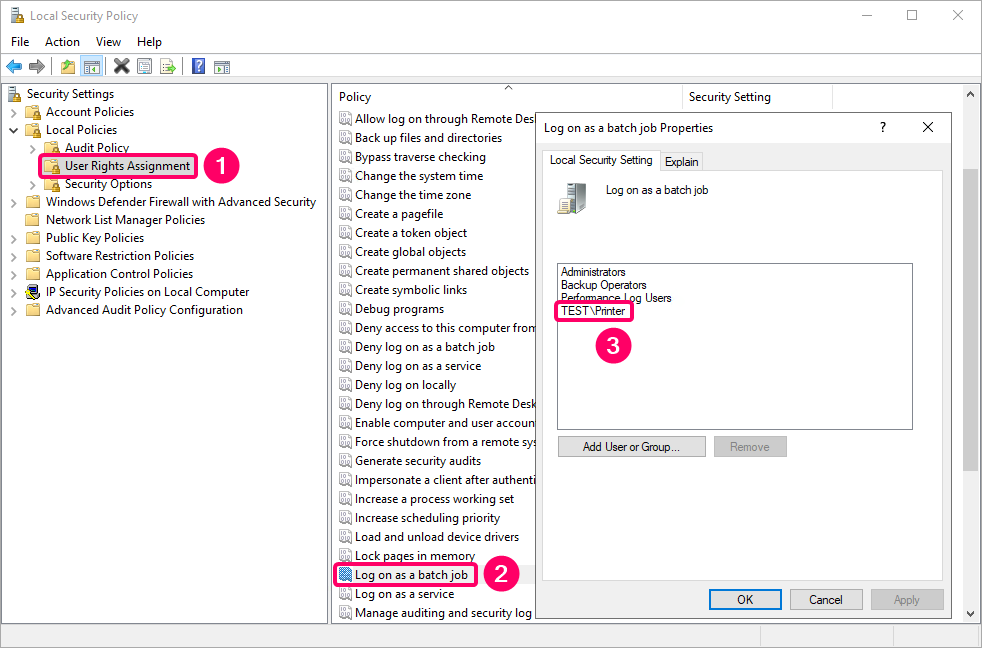
It warns us that the user account TEST\Printer must be assigned “Logon as a batch job” right. Otherwise attempts to run the script will fail with error 2147943785:
When you create a scheduled task in a Task Scheduler, it automatically assigns this right to the user, while schtasks.exe does not. So it is necessary to do this manually using secpol.msc:
Also, you can assign this right using secedit.exe command line utility, but this is not very straight forward.
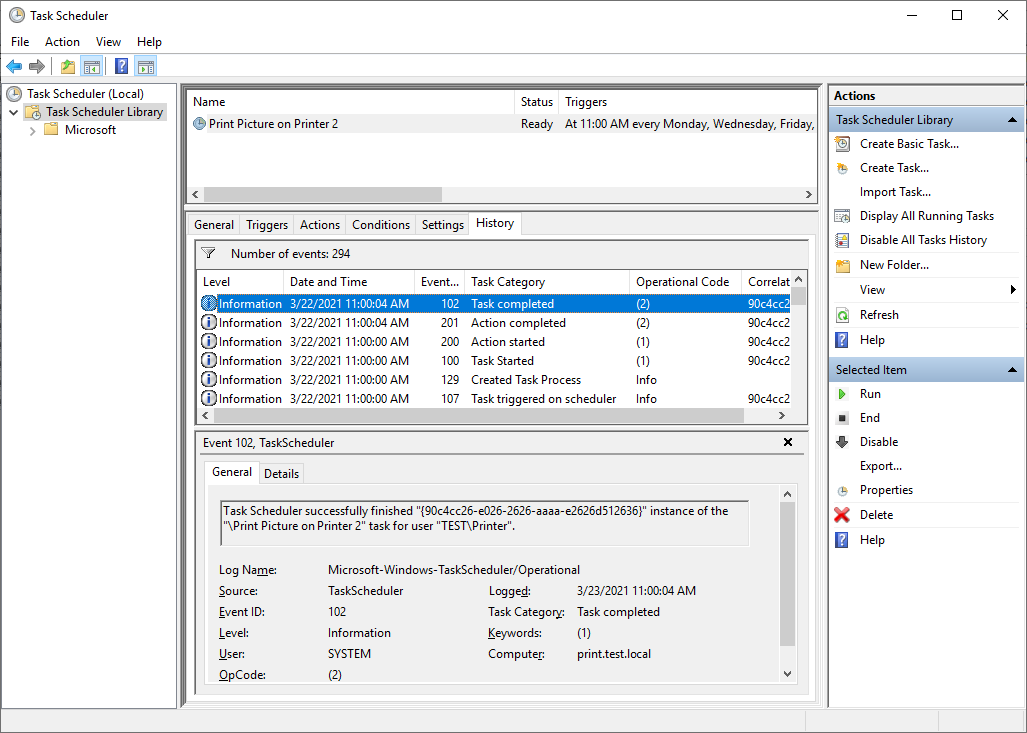
After assigning this right to the user it is possible to run the task. In a couple of moments Task Scheduler reports that task was completed:
And printer starts printing the image.